Question Posted to MLU
Looking for input on 216 oil pressure and oil flow.
Hi All
Well, I’m looking for comment from some of you who have restored 216 cu.in. Chevy engines. As you will know from previous posts I make it a practice of running engines on a test stand before putting them into the truck. I thought I was already to put the rebuilt original engine back in my HUP and was doing a long run (50 hour plus) on the engine to really get the temperatures fully equalized so I could do a finial adjustment of the valves. While I was doing this I noticed that at a low idle of 450-400 rpm the engine is only producing 5-6 PSI of oil pressure not unusual for 216s but, when I removed the valve cover I discovered that the oil flow out of by pass for the rocker arms was a lot less that what I every remember seeing. Flow from the individual rockers was OK but the total oil flow running out of the upper gallery is less than I remember from previous engine rebuilds.
Here is the list of what was done on the engine that would effect oil pressure and flow:
Crank ground and all new fitted main bearings.
New cam and cam bearings
New rocker arm shafts
New oil pump
New block to pan oil fitting.
What have I already checked:
Put a valve in the oil line to the oil filter to see if too much oil
was passing to the oil filter- no affect on oil pressure or on flow in
the valve gallery.
Checked the oil bypass control valve to be sure I had assembled the gaskets
in the correct order and that the poppet valve didn’t have something
under it. Everything looked OK.
Took sample of oil doesn’t smell of gas and seems to flow like new
oil, color light caramel.
If you wonder about the long test run on the test stand being a lot of
fuel, it is but I manage to time my engine running to winter. With the
engine exhaust hard piped out of the shop, running the engines is doing
double duty, running in the engine but also heating the shop at the same
time so I’m not burning any propane to heat the shop.
Wanted to ask for comments before I start tearing the engine down.
In particular how much oil have other people noticed running out of the rocker arm bypass tube in well run in engines? My memory is telling me it should be a good steady stream just under ¼ “ diameter.
Cheers Phil
______________
1st Response
First things I would look at....
The oil pump for possible air leaks on the sucking system......or attachment
of pump to block....
Possible too much clearance on bearings....... the hard bearing to check for clearance will be the camshaft.
You should be able to check oil pressure and all possible leaks by running the oil pump with a hi torque 3/8 or 1/2 inch drill with out running the engine..... that way you can check for large leak on crank. cam. valve train..... you may need to set up a larger oil container with a rubber tube from the pump to a 5 gallon can..... it will be messy....... cranking the engine by hand will also be feasible....... using the starter may prove to be dangerous as it will spin fast if the plugs are removed....... you engine stand will earn it money....
I got 42 pounds of oil pressure on my 261 using a hi torque screw gun......
Good luck....... keep us posted..... and wash you hands when you are finished.
Bob
__________________
Bob Carriere....B.T.B
C15a Cab 11
Hammond, Ontario
Canada
My Response
Good points Bob
Hi Bob
Good points Bob, I'm trying to see if I'm over looking something simple and to line up my thinking before taking things apart again.
Your point about using the a drill to check the pressure and flow raises an interesting question what is the RPM of the distributor vs. RPM of the engine? I can not remember if it is one to one.
As to the max pressure you mention for the 261 same for my 261 and 235 they basically max out at 42 psi though they will go higher on cold start with cold oil. Once the engine oil is warm the bypass in the pump itself starts dumping. Now I will have to check a 216 pump to see if same pressure max.
Wonder if I should just change the oil, wonder if the combination of all the assembly lube or dilution. When I pulled the head to get a better alignment on the side gasket, I pumped several ounces of oil into each cylinder to prevent any coolant from getting into the sump. (see http://canadianmilitarypattern.com/H...12%20April.htm ) Because of how I drained and sucked the cooling system clean of coolant before removing the head there was no water in any of the cylinders when I pulled the head off. But I wonder if maybe I did dilute the oil with lighter oil?
Your idea of hitching the pump up to external source of oil with pan off to see if the crank or cam are dumping oil is a good one. Messy but good.
One of the reasons I wish the Hammond Barn was closer so I could just pop in and look at another 216 engine running with the valve cover off. But having said that I'll take the valve cover of the C60L after it is warm and see how much oil is coming through the bypass.
As to washing my hands afterwards I always wear the blue rubber gloves.
Appreciate your input.
__________________
Phil Waterman
`41 C60L Pattern 12
`42 C60S Radio Pattern 13
`45 HUP
http://canadianmilitarypattern.com/
New e-mail Philip@canadianmilitarypattern.com
Bobs 2nd Response
You are in for a mess.... oily mess !!!!
But we would not be in this hobby if we wanted to keep clean.!!!!
Dizzy is driven by the camshaft gear and should run twice as fast as the engine crankshaft...... so a 3000 rpm drill is equivalent to 1500 RPM..... which is about mid range for the 216...more or less......
When I was priming my 261 with the drill and did not think that the pressure could get that high and did not bother installing hose clamps on the oil line to the external spin on oil filter..... big mistake,,,, the line came off....1/2 inch line .... and dumped half the crankcase oil on the floor before I could turn it off.
Yeah I wish you were closer and we could both get down and oily together.
One more reason for using a discarded CMP frame...... with the engine higher off the ground I could install a 5 gallon can below the engine with a light sheet metal trough wide nough to catch all the dripping oil and flow it into the 5 gal. can...... I would fit an extension rubber hose on the pick up from the pump where the screen fits....and clamp it so no air enters......
I would use the cheapest 10w30 bulk oil I could find.... and only use it for the test...... then I would recycle the oil in my wood furnace next Winter...!!!
...or you could just dump the oil you now have with possibly some dilution and fill it with fresh 20-50 racing oil...... and see how it behaves..... certainly worth the oil cost and effort at this stage......
You better get yourself the arm long rubber gloves used by vets... the short blue Nitryle ones will never suffice.... you will be going deep with this one.
If you are going to test out the C60 try using the same oil pressure gauge to eliminate any gauge error.
You are not about to get dry skin !!!!
Bob
__________________
Bob Carriere....B.T.B
C15a Cab 11
Hammond, Ontario
Canada
Next Step
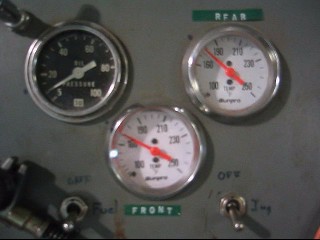
Was to document the oil flow and check for indications of air being sucked into the pick up. To do this I took several videos of the oil flow in the valve gallery. All of the video is shot of the engine at full operating temperature of just over 170F and the oil up to 130-160 range. Checking at 1500-1750 RPM and at idle of 400-500 RPM also at the lowest possible idle speed 300 RPM
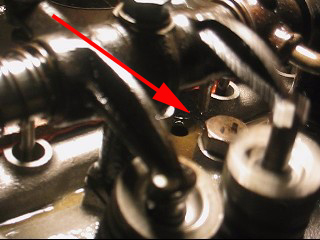
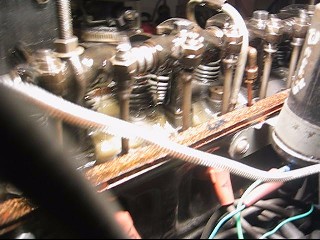
Looking at the flow out of the rocker arm by pass that is at the end of the pressure system you can see in this picture taken before the oil was changed at very low RPM almost no oil.
.
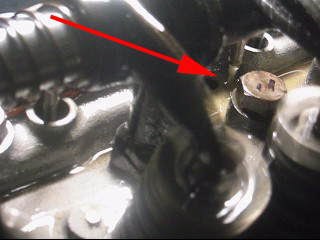
While in picture below after changing the oil and the engine at higher RPM a more normal flow
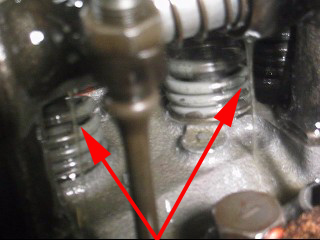
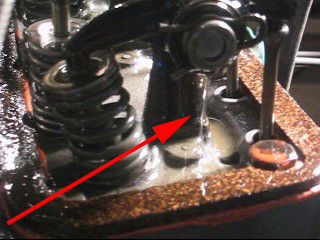
But these 2 photos from the video probably show what the real problem is excessive oil flow fro the individual rocker arms particularly in the rear section of the rocker arm assembly that is slightly lower than the front because of the 3 degree tilt of the engine.
Video of engine test
Video is 5:30 long and hi-resolution so it is a large file intended for DSL or better connections.
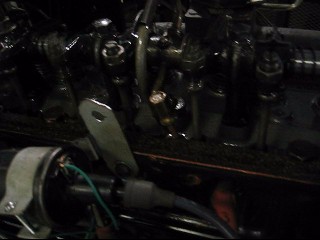
Next stem was to block off the oil feed to the rocker assembly to see if this had any impact.
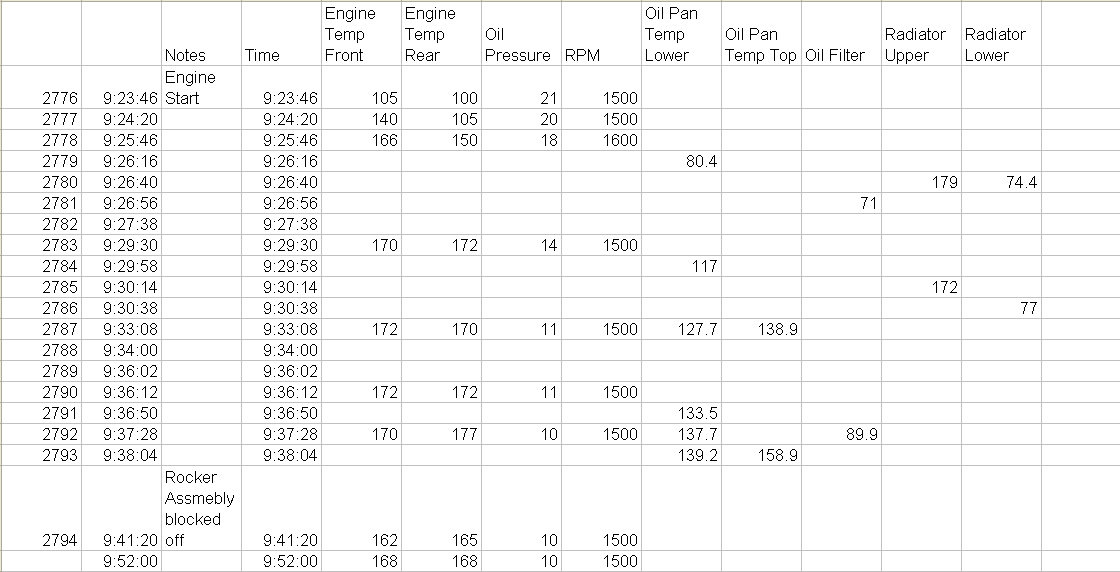
First brought the engine up to operation system with rocker assembly connected collect the below information about time and temperature.
All this to discover that the oil flow or leakage around the individual rocker arms WAS NOT THE CAUSE with oil completely blocked off there was no difference.
Now for a really, really dull Video
On to Plan B get out another engine.
Having decided after yesterday morning test that the problem was not going to have an easy fix, something that didn't require dropping the oil pan and removing the pump to even begin to find the problem decided to go to Plan B bring out another 216 engine that is known to be running good. This is the engine that I removed from Beauty the Pattern 13 C60S when I up engined that truck to a 261 cubic inch engine. (See video of the engine pull and new engine instal ) When I pulled this engine I wanted to keep it as complete as possible so it got put away on an engine test stand complete, minus only the fan, pulley and generator which were transferred to the other engine.
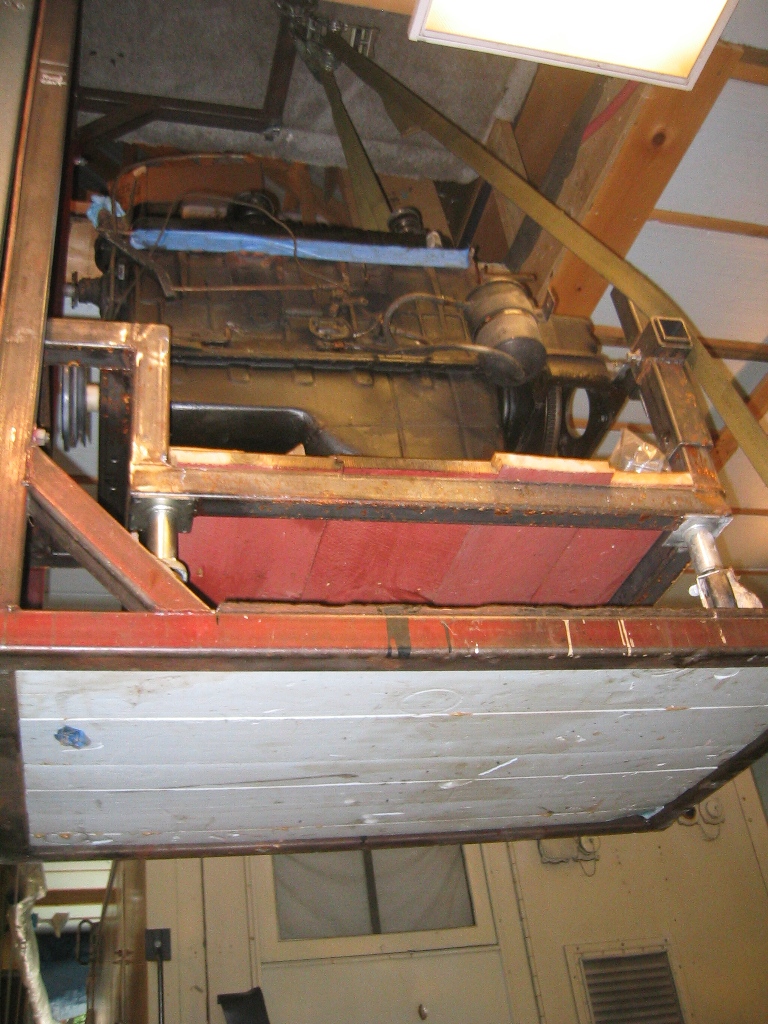
Picture at right shows it coming down on the lift from the loft.
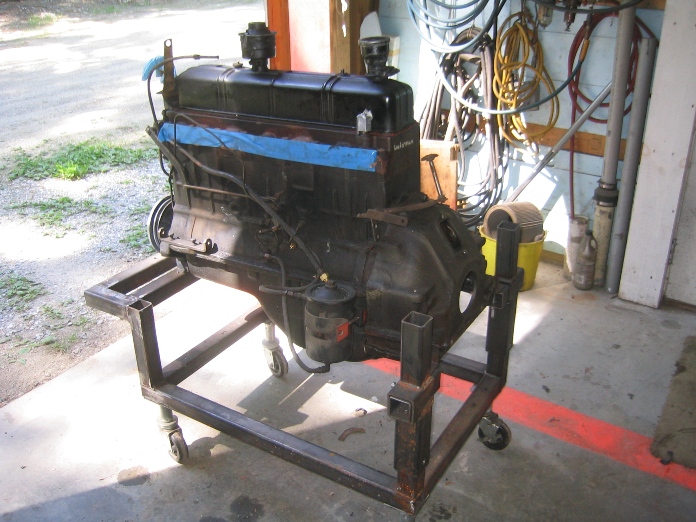
Below left getting cleaned for coat of paint
Below right first round of testing - yes this one seem to have more pressure and flow when tested cold with drill down the distributor drive.
This engine is a 1942 was rebuilt in 1980s for the Patter 13 C60S so it has some miles on it. Only real difference is the Junior or smaller oil filter.

|
Go To HUP OVERHAUL 2011- Page 1 After 66 years The BEAST is being completely disassembled and overhaul New January 30th - updated April 1st |
January and February 2012- Page 10 Been a slow period with weather to cold to paint and progress really at the point of needing to finish painting the chassis and body so that other parts can be assembled. Engine testing continues. Update 3/10/12 |
|
| Go To HUP OVERHAUL 2011- Page 2 |
March 2012 - Page 11 Lots of minor work with little visible progress until the body and chassis are reunited. Then painting progress starts again. Updated 3/28/12 |
|
| April Work - Page 3 was centered around the Transmission, Spring Shackles, Cleaning and Painting of the bottom of the body, Engine Testing then disassembly. Updated 12/11/11 | April
2012 - Page 12 The month of April saw work on the following:
|
|
| May Work - Page 4 included finding a replacement cylinder head, finding and installing spring shackle bushings and pins. Cleaning and painting the frame, Updated 12/11/11 |
May 2012
|
|
| June Work - Page 5 painting and body work begins and trying to match the original color of the HUP, brake work, reassembly of the axle assembly. Updated 12/11/11 | June 2012 | |
| July Work - Page 6 handling painting and body how do you pick up and turn a HUP body on its side by yourself. Machining the hardened steel spring shackles. Pictures of the wooden blocks used as frame inserts at the attachment locations. Brake line installation. Updated 12/11/11 |
July 2012 - HUP and two other CMPS off to the Merrimack Valley Military Vehicle Collectors Club 25th Anniversary Summer Rally - Come and join us. |
|
| August & September Work - Page 7 engine comes back from the machine shop almost ready for reassembly before the problems start. Body lowered on to the body for fitting and further body work, which included replacing some rusted damaged areas. Updated 12/10/11 | ||
| October & November Work - Page 8 body work continues, repairing the fatigue cracks in the front door where the hinges attach, a common CMP problem, installation of chassis parts like shocks. Problems with assembly of the engine but in the end everything is fitted in place. Updated 12/10/11 | ||
| December Work - Page 9 engine assembly completed and run in started on the test stand. Hidden design surprises in the CMP adaptation of the Stovebolt 6. Work on the chassis nearing completion with only a little painting and the installation of the wiring harness to be done. Body is ready to be primed and painted. Updated 12/10/11 | ||
| BACK TO HOME PAGE | ||